

You unload the dishwasher and notice a gritty film on a plate. A coffee mug has a ring of old residue. The top rack is fine, but the bottom rack looks like nothing happened. You run the cycle again, switch detergents, maybe rinse everything by hand first, and the problem keeps coming back.
Before you assume the whole machine is failing, look at the part that does the real work: the spray arms. When the small holes in those arms fill up with food bits, soap residue, or mineral scale, water cannot reach your dishes with enough force. The motor still runs and the cycle still finishes, but the cleaning power is gone.
The good news is that clogged dishwasher spray arms are one of the most fixable dishwasher problems in a home. Most people can take an arm off, clean it, and put it back in under an hour with basic household supplies. This guide walks you through every step, explains what causes the blockage, shows you what to avoid, and tells you honestly when it is smarter to call a professional.
What Dishwasher Spray Arms Actually Do
A dishwasher does not scrub. It sprays. Water is heated, mixed with detergent, and pushed through the spray arms, which spin as water leaves the holes along their edges. Each hole is aimed at a different angle so water reaches plates, bowls, cutlery, and the inside walls of glasses.
Most dishwashers have at least two arms:
- Lower spray arm: Sits at the bottom of the tub, below the lower rack, and handles the bulk of the load.
- Upper spray arm: Hangs under the top rack or sits above it and cleans the upper level.
- Third rack or mid level arm: Found on many newer models, often a small arm or a spray tower that serves a shallow cutlery tray.
The arms rely on water pressure, small openings, and free rotation. If any one of those three things is disrupted, cleaning quality drops. A partly blocked arm can also spin unevenly, which leaves dead zones where nothing gets sprayed.
Signs Your Dishwasher Spray Arms Are Clogged
Many homeowners search for a broken dishwasher fix when the real issue is a blockage. Watch for these patterns:
- Dishes come out with food specks, gritty residue, or a cloudy film
- One rack cleans well while the other does not
- You can hear water hitting the door or tub walls instead of spraying evenly
- The arm barely turns, turns slowly, or wobbles when you spin it by hand
- White or gray crust is visible around the spray arm holes
- Detergent pods or powder are left partly undissolved
- A sour or musty smell lingers after a cycle
- Glasses look foggy even when you use rinse aid
If you notice two or three of these together, a blocked spray arm is a strong suspect. If water is pooling at the bottom after the cycle, that is a different problem, and our guide on draining issues will help you sort it out. Read more here: why your dishwasher is not draining all the water.
What Causes Clogged Dishwasher Spray Arms in the First Place?
Knowing the cause helps you stop it from happening again. In most homes, blockages come from one of four sources.
Food particles that slip past the filter
The filter at the bottom of the tub is meant to catch debris, but it only works when it is clean. A full filter lets small particles circulate with the wash water. Seeds, rice grains, poppy seeds, small bone fragments, and bits of pasta get pushed into the spray holes and lodge there.
Hard water minerals
Calcium and magnesium leave a chalky layer on any surface that is repeatedly heated and wetted. Spray arm holes are small, so even a thin layer of scale shrinks them. If you live in an area with hard water, scale is often the main culprit rather than food. Abilene residents deal with this regularly, and we cover it in detail in how Abilene hard water affects your appliances.
Detergent and rinse aid residue
Powder detergent that does not fully dissolve can harden into a paste around the openings. Heavy use of rinse aid on top of already hard water can add to the film.
Pre-rinsing habits and overloading
Surprisingly, rinsing off every plate does not help. Modern detergents need some food soil to activate properly. Overloading is another trigger. Tall pots and cookie sheets can block the arm from turning, which causes water to hit the same spot repeatedly and leave debris in place.
The Homeowner Mindset: Why People Hesitate (and Why You Should Not)
Most people delay this job for a few reasons:
- Fear of breaking something. The arms look fragile or complicated. In reality, most are held on by a simple twist, clip, or single nut.
- Not sure it is the arm. Because the symptoms overlap with filter, pump, and detergent issues, people jump to the idea that the machine is dying.
- Worry about cost. A service call feels expensive for a problem that may turn out to be a few grains of rice.
- Time pressure. Nobody wants a dishwasher out of use for a weekend.
Here is the reassuring part. Cleaning a spray arm costs next to nothing, takes under an hour, and carries very little risk when you follow a careful method. If it turns out the arm is cracked or the problem is elsewhere, you will know within one cycle and can make a better decision from there.
Safety First: Prepare Before You Touch the Dishwasher
Safety is the part most guides rush through. A few minutes here prevents shocks, cuts, and damaged parts.
- Cut the power. Unplug the dishwasher or switch off its circuit breaker. If it is hardwired under the sink and you cannot reach a plug, use the breaker panel. The Electrical Safety Foundation International has practical home electrical safety guidance that explains why turning power off at the source matters before any appliance work.
- Let it cool. If you ran a cycle recently, wait until the interior and any standing water are cool to touch.
- Empty the tub completely. Remove both racks, cutlery trays, and any loose items.
- Check for broken glass or sharp objects. Look carefully at the bottom before you reach in. Wear thin work gloves if you are unsure.
- Lay down a towel. Water will drip. A towel protects your floor and gives you a soft place to set parts.
- Take a photo. A quick picture of how the arm sits before you remove it makes reassembly easier.
- Grab the manual. If you still have the owner’s manual, check the spray arm section. Many brands post PDF manuals online if you search the model number on the inside edge of the door.
Tools and Materials You Will Need
You do not need specialty tools. Here is what to gather:
| Item | Purpose | Notes |
| Work gloves | Protect hands from glass and scale | Thin nitrile or cotton gloves are enough |
| Towel | Catch drips and cushion parts | Use an old one |
| Flat or Phillips screwdriver | Remove arm screws if present | Only some models need it |
| Small socket or pliers | Remove a center nut on certain models | Rarely needed |
| Wooden toothpicks | Clear spray holes | Safer than metal pins |
| Soft bottle brush or old toothbrush | Scrub arm surfaces and holes | Avoid steel bristles |
| White vinegar | Dissolve mineral scale | Use plain white vinegar |
| Citric acid (optional) | Stronger scale remover | Found in grocery stores |
| Dish soap and warm water | Remove grease and soap film | Standard dish soap is fine |
| Bucket, basin, or sink | Soak the arms | Large enough to submerge the arm |
| Flashlight | Look inside spray holes | Phone light works |
How to Remove Dishwasher Spray Arms (By Type)
Removal methods differ by brand and design. Try gentle movements first. Never force a part that feels stuck.
Step 1: Take Out the Racks
Pull the lower rack all the way out until the wheels clear the rails, then lift it free. Set it aside. For the upper rack, extend it, release the rail stops if needed, and slide it out.
Step 2: Remove the Lower Spray Arm
The lower arm usually uses one of these systems:
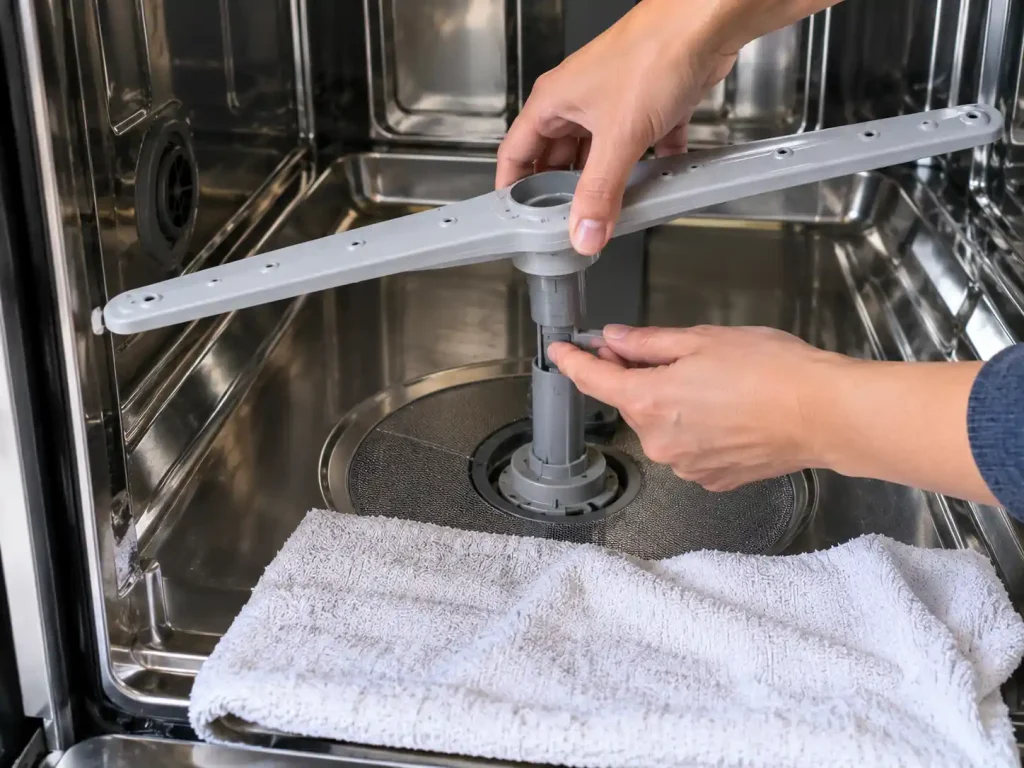
- Twist and lift: Grip the arm and rotate it a quarter turn counterclockwise, then lift straight up.
- Snap or clip: Press down slightly and pull upward until the clip releases. Some models need you to squeeze a tab at the center.
- Center nut or cap: Unscrew the plastic nut by hand in a counterclockwise direction. Some require a small socket.
- Screw down: A single screw sits in the middle. Remove it and lift the arm off.
Lift the arm straight up so you do not bend the shaft or crack the plastic hub. Keep any washers, clips, or caps in a small bowl so they do not disappear down the drain area.
Step 3: Remove the Upper Spray Arm
The upper arm is usually attached to the underside of the top rack or to a mount on the tub ceiling. Look for a:
- Locking nut you spin counterclockwise
- Plastic clip you press and slide
- Snap fit you pull down firmly while holding the mount
Support the arm with your other hand so it does not drop onto the rack.
Step 4: Check for a Third Rack Arm or Spray Tower
Newer models may have a small arm above the cutlery tray or a vertical spray tower at the back. These often detach by lifting, sliding, or twisting a small cap. Check your manual because they differ more than lower and upper arms.
Step 5: Look at the Seats and Seals
With the arm out, examine the post it sat on. Check for:
- Food debris packed into the base
- Cracked or hardened rubber seals
- Mineral crust where the arm rotates
- A loose or damaged feed tube
If you see any damage here, make a note. It affects what you do next.
Step by Step: Cleaning Clogged Dishwasher Spray Arms After Removal
Now the actual cleaning begins. Work in this order for the best results.
Step 1: Inspect Before You Clean
Hold the arm up to light and look through each hole. Note which are fully blocked, partly blocked, or clear. Shake the arm gently. If you hear rattling, loose debris is trapped inside. Many arms are hollow, so what you see at the surface is only part of the blockage.
Step 2: Rinse Under Warm Running Water
Hold the arm under warm water and let it run through the holes. Turn it over and flush from both ends if the design allows. This often pushes out loose food and seeds without any tools.
Step 3: Clear Each Hole Gently
Use a wooden toothpick, a plastic pick, or a soft nylon bristle to clear any remaining blockage. Work from the outside of each hole inward, then flush with water again.
A few important cautions:
- Avoid metal pins or needles if you can. They can scratch the plastic and widen the holes, which changes the spray pattern.
- Do not drill or enlarge the holes. Wider holes drop water pressure.
- Be patient with scale. If a hole will not clear, it probably needs soaking, not more force.
Step 4: Soak to Dissolve Mineral Scale
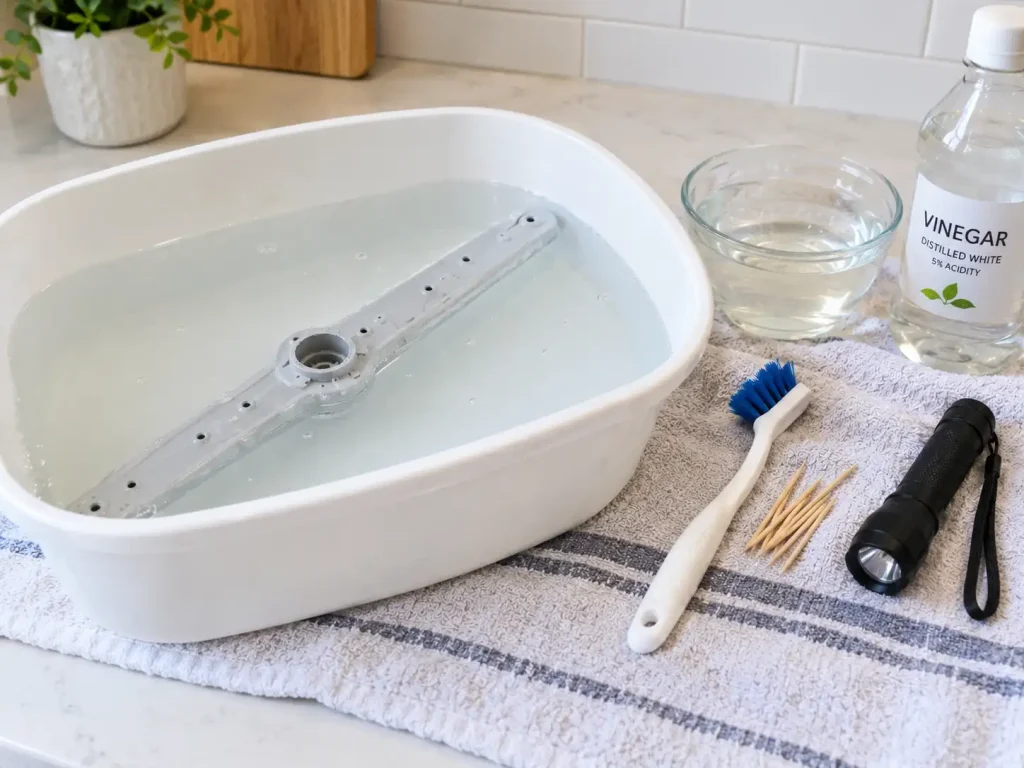
Fill a sink or basin with enough warm water and white vinegar (about equal parts) to cover the arm completely. Let it soak for 30 to 60 minutes. For heavy scale, you can use a citric acid solution (about 1 to 2 tablespoons per liter of warm water) for the same time.
Do not leave plastic arms soaking overnight. Over time, strong acids can dull or weaken some plastics and affect small rubber parts.
If your arm has a metal component or a stainless steel finish, follow the manufacturer’s care guidance, since some finishes react poorly to prolonged acid contact.
Step 5: Scrub and Rinse
After soaking, scrub the surface and holes with a soft brush. Rinse thoroughly with clean water. If you used vinegar, wash with a little dish soap to remove the acidic film, then rinse again.
Step 6: Flush the Inside of the Arm
Hold the arm under a faucet and let water run through the center opening while you tilt it. Watch for cloudy water or debris coming out of the holes. Repeat until the water runs clear.
Step 7: Dry and Final Check
Shake off water and let the arm air dry on a towel for a few minutes. Look through the holes again with a flashlight. Every opening should be visibly clear.
Cleaning Methods Compared
Not every method suits every situation. Use this table to choose.
| Method | Best For | Time Needed | Cost | Cautions |
| Warm water flush | Loose food and seeds | 5 minutes | Free | May not clear hardened debris |
| Toothpick or plastic pick | Individual stuck holes | 10 minutes | Very low | Do not widen holes |
| White vinegar soak | Light to medium scale | 30 to 60 minutes | Low | Do not soak overnight |
| Citric acid soak | Heavy mineral scale | 30 to 60 minutes | Low | Rinse very well afterward |
| Dish soap and soft brush | Grease and soap film | 10 minutes | Very low | Use soft bristles only |
| Replacement arm | Cracked, warped, or permanently blocked arms | 15 minutes | Moderate | Match the exact model |
Clean the Parts Around the Spray Arms Too
If you clean only the arm, the same debris will clog it again within weeks. Take five more minutes for the surrounding parts.
The dishwasher filter
Most dishwashers have a cylindrical or flat filter in the bottom of the tub. Twist it counterclockwise and lift it out. Rinse under running water and scrub gently with a soft brush. Pay attention to the fine mesh screen, which can hold grease and small particles.
The tub floor and sump area
Wipe the bottom of the tub and look under where the filter sits. Bits of glass, label scraps, and food often hide here. Remove them carefully by hand.
The center feed tube and arm post
Make sure the post that supplies water to the lower arm is clear. A blocked feed path can cause weak spray even when the arm itself is clean.
Door gasket and edges
Wipe the gasket and lower door edge to remove sludge. It will not clog the arm, but it improves hygiene and smell.
How to Reinstall the Spray Arms and Test the Result
Reassembly is the reverse of removal.
- Place the lower arm back on its post and press or twist until it clicks or seats firmly.
- Spin the arm by hand. It should rotate freely without catching, scraping, or wobbling.
- Reattach the upper arm using the same method you removed it with.
- Check the third rack arm or spray tower if your model has one.
- Return the filter and make sure it is locked in.
- Slide in the racks and make sure nothing blocks the arms when the racks are in position.
- Restore power.
- Run a short or rinse cycle with no dishes first.
- If safe, pause partway and look at the spray. Each arm should throw water in a steady pattern.
On the first full cycle with dishes, check results afterward. If dishes are noticeably cleaner, you fixed it. If not, you have learned something useful: the arm was probably not the only issue.
Common Mistakes That Damage Spray Arms
These are the missteps we see most often:
- Forcing the arm off. Cracked hubs are one of the most common outcomes. Twist, press, or unscrew as the design requires.
- Using metal skewers or drill bits. They can scratch and enlarge holes permanently.
- Mixing cleaning chemicals. Never combine vinegar with bleach. It releases harmful fumes.
- Soaking too long. Overnight acid soaks can weaken plastic.
- Running the dishwasher with the arm only half seated. It may spin off, hit racks, or leak.
- Ignoring the filter. A clean arm in a dirty system clogs again quickly.
- Skipping the power off step. Do not take shortcuts here.
- Using steel wool or abrasive pads. They scratch surfaces where scale then grows faster.
Prevention: How to Keep Spray Arms Clear Long Term
A few simple habits reduce blockages by a large margin.
| Task | How Often | Why It Helps |
| Rinse the filter | Weekly to every two weeks | Stops debris from circulating |
| Scrape plates (do not pre rinse) | Every load | Removes large scraps while keeping detergent effective |
| Check spray arm holes | Monthly | Catches early buildup |
| Run a vinegar or citric acid cycle | Every 1 to 3 months | Reduces scale in hard water areas |
| Deep clean arms | Every 3 to 6 months | Clears hidden internal buildup |
| Use rinse aid correctly | Per product guidance | Reduces spotting without heavy residue |
| Load properly | Every load | Prevents arm blockage and uneven spray |
Cleaning the spray arms is only one part of a healthy kitchen routine. If you want every appliance in your home to last longer and run more efficiently, our home appliance maintenance checklist walks you through monthly, quarterly, and yearly tasks, including dishwasher filters, door gaskets, and the other machines you rely on daily.
If your water is hard, consider a water softener or a dishwasher softener salt compartment if your model supports it. The USGS explains how water hardness is measured and why it affects appliances, which helps you understand why some homes see scale faster than others.
Running full loads on efficient settings also keeps the machine working as designed. ENERGY STAR offers solid dishwasher efficiency and usage guidance if you want to get more from each cycle.
Should You Repair, Clean, or Replace the Spray Arm?
Not every arm can be saved. Use this quick guide.
Clean it when:
- The arm is intact and spins freely
- Holes are partly blocked but can be seen through after a soak
- There is only light surface scale
Replace it when:
- The plastic is cracked, warped, or brittle
- Holes are permanently melted shut or heavily scarred
- The arm wobbles because the hub is worn
- Mineral buildup returns within days after thorough cleaning
- A piece has snapped off
Replacement arms are generally an inexpensive part for most mainstream brands, though price depends on make and model. Always match the exact model number found on the tag inside the door frame. A generic arm that almost fits can leak, scrape the rack, or spin poorly.
Cost snapshot
| Scenario | Typical Approach | Rough Cost Range |
| Light blockage | DIY clean | Under $5 in supplies |
| Heavy scale | DIY soak and replace worn seals | $5 to $30 |
| Cracked or damaged arm | Replacement part, DIY install | Varies by brand and model |
| Persistent poor cleaning after DIY | Professional diagnosis | Many appliance repairs fall in the $100 to $500 range depending on the issue |
If repair costs start to climb, it helps to weigh them against the age of the machine. Our guide on how to decide whether to repair or replace an appliance with the 50% rule gives you a simple method for that decision.
When the Spray Arms Are Clean but Dishes Still Look Dirty
Sometimes you clean everything and still see poor results. That usually points to one of these:
- Low water supply: A partly closed shut off valve or kinked supply line reduces fill volume.
- Inlet valve problems: The tub may not be filling to the right level.
- Circulation pump trouble: The pump pushes water to the arms. If it is weak, the arms cannot spray hard even when clean.
- Heating element issues: Cold water cleans poorly and leaves grease behind.
- Wrong detergent or dosage: Too much or too little causes film or poor cleaning.
- Blocked drain hose or air gap: Dirty water may flow back and recirculate.
- Worn or damaged seals: Water escapes before reaching the arms.
Checking these goes beyond a simple cleaning job and usually requires testing with a meter or inspecting internal components.
When to Call a Professional
DIY is a great first step, but there are clear signs to stop and get help:
- The arm will not come off without force
- You see cracks, melting, or burn marks near the arm or tub
- Water leaks from the tub or arm base during a cycle
- The dishwasher trips a breaker or has a burning smell
- You hear grinding or humming without water movement
- Dishes remain dirty after a thoroughly cleaned arm, filter, and tub
- You are not comfortable working with the machine
At that point, a trained technician can test the pump, inlet valve, heating element, and wiring safely. If you live in Abilene or nearby, our team can help with a full inspection through our dishwasher repair service.
We also serve surrounding communities. Homeowners can reach us for appliance repair in Tye, TX and appliance repair in Buffalo Gap, TX , and you can browse everything we offer on our services page.
Not sure what the problem is? Contact our team and describe the symptoms, and we will point you in the right direction.
Brand and Model Notes Worth Knowing
Spray arm design varies, so a few quick observations help:
- Many Whirlpool, GE, and Frigidaire units use a simple lift or twist release on the lower arm.
- Bosch and similar European style machines often use clip and twist fittings on upper and lower arms. Bosch itself describes the process as unscrewing the upper arm and unclipping the lower arm.
- Some Samsung and LG models have additional spray towers or multi level arms that are more complex to remove.
- Stainless steel tub models may use different mounts than plastic tub models.
If you are unsure, search your model number plus the words spray arm removal, or consult the manufacturer’s page. Specialized parts matter, which we explain in our comparison on Samsung and LG appliance repair.
More Maintenance Guidance From Our Team
If you enjoy keeping appliances running smoothly, our full library of practical guides lives on the appliance repair blog.
You can also learn more about who we are and how we work on our About Us page.
For urgent appliance trouble or a quick quote, head to our Abilene Appliance Experts home page.
Frequently Asked Questions
How do I know if my dishwasher spray arm is clogged?
Look for food residue on dishes, uneven cleaning between racks, a spray arm that barely turns, or visible debris and white scale around the holes. Spin the arm by hand and check each opening with a flashlight to confirm.
Can I remove a dishwasher spray arm myself?
Yes. Most spray arms are held by a twist lock, clip, nut, or single screw. Turn off power, remove the racks, and lift the arm gently according to your model. Stop if it will not release without force.
How often should I clean dishwasher spray arms?
Check the holes monthly and do a full removal and soak every three to six months. In hard water areas, clean them more often to stay ahead of scale.
Is vinegar safe for cleaning spray arms?
White vinegar is safe for most plastic arms when used for 30 to 60 minutes. Rinse thoroughly, and do not combine it with bleach. Avoid long overnight soaks.
What is the best tool for unclogging spray arm holes?
A wooden toothpick or plastic pick is the safest option. Metal pins can scratch the plastic and enlarge the holes.
Why is my dishwasher spray arm not spinning?
Common reasons include a blockage inside the arm, a dish or utensil blocking rotation, a worn hub, a poorly seated arm, or low water pressure from a pump or inlet issue.
Can a clogged spray arm damage my dishwasher?
Over time, yes. Poor circulation makes the pump work harder, leaves residue throughout the tub, and shortens the life of seals and components.
How long does it take to clean the spray arms?
Plan on 45 to 90 minutes, including removal, soaking, scrubbing, and reinstalling. Hands on time is often 20 minutes or less.
Should I replace the spray arm or clean it?
Clean it if it is intact and spins freely. Replace it if you find cracks, warping, melted holes, or buildup that returns right away after a deep clean.
When should I call a repair technician?
Call a pro if the arm will not detach safely, if you notice leaks, burning smells, or electrical issues, or if dishes are still dirty after cleaning the arms, filter, and tub.
Keep Your Dishwasher Spraying Strong
A dishwasher is only as good as the water it can throw. When the spray arm holes narrow, even the best detergent cannot make up for it. The fix is rarely dramatic: shut off the power, lift out the arm, flush it, soak away the scale, clear the holes gently, clean the filter, and test.
Make it a habit. A quick monthly glance, a clean filter, and a seasonal soak keep most blockages from forming at all. If you do all of that and the results are still disappointing, the problem is likely deeper in the system, and a proper diagnosis will save you from guessing and spending money on the wrong part.
Whether you handle it yourself or want an experienced technician to take a look, you now know exactly what to check, what to avoid, and when to step back. Your next load of dishes should come out the way they are supposed to.