

Your home appliances deserve more attention than they get. Most homeowners only think about their refrigerator, washing machine, or stove the moment something goes wrong. By then, a simple fix has usually become an expensive repair or a full replacement.
Nearly 1 in 2 homeowners admit to worrying about appliance failure, and 23% say they do not maintain their appliances at all. That gap between concern and action is exactly where this checklist comes in.
This complete home appliance maintenance checklist covers every major appliance in your home, including what to do, how often to do it, and why it matters. Follow this guide and you will spend less on repairs, lower your monthly energy bills, and get significantly more years out of every machine in your house.
What Happens When You Skip Appliance Maintenance
Before getting into the tasks themselves, it is worth understanding what neglect actually costs you.
A well maintained refrigerator can run for 15 to 20 years, while a neglected one might fail after just 8 to 10. That is a gap of up to a decade, which translates directly into thousands of dollars in premature replacement costs.
Regular maintenance can prevent up to 70 percent of common appliance failures. Think about that number. The majority of breakdowns that homeowners deal with every year are preventable with nothing more than routine care.
Beyond repairs, poorly maintained appliances quietly drain your energy budget. Dirty condenser coils force a refrigerator compressor to work harder. A lint clogged dryer vent adds 20 to 30 minutes to every cycle. A water heater full of sediment burns more energy heating the same amount of water. All of that inefficiency shows up on your utility bill every single month.
Appliances that are not functioning optimally tend to consume more energy, leading to higher utility bills. Timely maintenance ensures that your appliances run efficiently, resulting in significant savings on your monthly electricity bills.
The bottom line is simple. A little time spent on maintenance now saves a lot of money later.
Refrigerator Maintenance Checklist
The refrigerator is the hardest working appliance in your home. It runs 24 hours a day, 7 days a week, every single day of the year. That constant operation makes it uniquely dependent on regular attention.
Monthly Refrigerator Tasks
Wipe down the interior
Use a solution of one tablespoon of baking soda per quart of warm water. This prevents odor buildup and keeps food storage areas hygienic without leaving behind chemical residue.
Check the door gasket
Close the refrigerator door on a thin piece of paper and try to pull it out. If it slides out with little resistance, the seal is failing and warm air is constantly leaking in. A weak gasket forces the compressor to run more often than it should, which raises energy costs and shortens the unit’s life.
Verify temperature settings
The fresh food compartment should sit between 37 and 40 degrees Fahrenheit. The freezer should hold at 0 degrees Fahrenheit. Use a standalone appliance thermometer rather than relying on the built in dial, which can drift off calibration over time without any visible sign.
Every 6 Months
Vacuum the condenser coils
This is arguably the single most impactful maintenance task for any refrigerator. The condenser coils are located either at the back of the unit or along the bottom behind the kick plate depending on the model. Cleaning condenser coils every 6 months is one of the most effective ways to maintain refrigerator efficiency. Dust and pet hair coat these coils over time, which traps heat and forces the compressor to work much harder to keep the interior cool. A vacuum with a brush attachment handles the job in about five minutes.
Inspect the drain hole and drip pan
The drain hole at the back of the interior and the drip pan beneath the unit collect condensation over time. Food debris can clog the drain hole, causing water to pool inside the refrigerator. Clean both components every six months to prevent standing water and odor.
Every Year
Replace the water filter
If your refrigerator has an ice maker or water dispenser, the filter should be replaced every six months or as recommended by the manufacturer, to ensure your water and ice are free of contaminants and taste fresh. For households that use the dispenser heavily, every six months is the right interval. For lighter use, annually is the minimum. A filter past its service life can actually introduce more contaminants than it removes.
Check that the unit is level
An unlevel refrigerator puts uneven stress on the door hinges, causes the doors to seal inconsistently, and can put added strain on the compressor. Most refrigerators have adjustable leveling feet at the base. A simple bubble level on top of the unit tells you what you need to know.
Related Post: https://abileneapplianceexperts.com/why-is-my-refrigerator-not-cooling/
Dishwasher Maintenance Checklist
The dishwasher cleans your dishes every day, but it needs to be cleaned itself on a regular schedule. Skipping dishwasher maintenance is the most common reason homeowners end up with cloudy dishes, lingering odors, and standing water at the bottom of the tub.
Monthly Dishwasher Tasks
Clean the filter
Modern dishwashers have a cylindrical filter at the bottom of the tub that catches food particles before they recirculate onto your dishes. The filter traps food particles and debris, so it is important to clean it regularly. A clogged filter can reduce cleaning performance and lead to unpleasant odors. Twist the filter out, rinse it under warm running water, and use a soft brush to remove any stubborn buildup before reinstalling it.
Clear the spray arms
Hold the spray arms up to a light and look through the small holes. Mineral deposits and food debris clog these holes over time and reduce cleaning power. A toothpick or thin wire works well for clearing them out.
Wipe the door gasket
The rubber seal around the dishwasher door collects moisture and food residue in its folds and creases. Mold develops there quickly in a warm, humid environment. Wipe the entire gasket with a damp cloth every month, paying close attention to the areas where the seal flexes.
Every 3 Months
Run a vinegar cleaning cycle
Place a dishwasher safe cup filled with white vinegar upright on the top rack of an otherwise empty machine. Run a hot water cycle to eliminate odors and mineral buildup. Follow this with a sprinkle of baking soda across the floor of the tub and a short hot wash cycle to freshen the interior completely.
Inspect the spray arm mounts
Over time the spray arms can loosen from their mounting points. Give them a gentle tug to confirm they are secure. A loose spray arm wobbles during the wash cycle and creates uneven water distribution, which means some dishes come out clean and others do not.
Every Year
Have the water inlet valve and drain connections inspected
These components are under constant water pressure. Slow leaks from worn connections often go completely unnoticed until water damage has already occurred in the cabinet beneath the unit. If you ever notice any moisture, warped wood, or a musty smell under the dishwasher, do not wait.
Oven and Range Maintenance Checklist
Whether you cook on gas or electric, the oven and range work hard around every holiday, every weekend, and every family dinner. Keeping them clean and calibrated improves cooking results, saves energy, and prevents grease fires.
Monthly Oven and Range Tasks
Clean the burner grates and drip pans
On a gas range, remove the burner caps and grates and wash them in hot soapy water. While they soak, wipe debris away from around the igniter ports. Inspecting and cleaning gas burners with warm, soapy water keeps them working efficiently. Clogged igniter ports cause uneven flames or burners that will not light.
Inspect the oven door seal
The rubber or woven fiber gasket running around the oven door frame keeps heat inside the cooking chamber. Run your finger along the entire seal. If it is torn, compressed flat, or pulling away from the frame in any section, heat is escaping every time you cook. The oven then works harder to maintain temperature and your food takes longer to cook.
Wipe down the stovetop
Clean spills as soon as the surface cools after cooking. Baked on spills become much harder to remove and can create smoke during future cooking sessions.
Every 3 Months
Use the self clean cycle
If your oven has a self clean feature, run it quarterly. This high heat cycle incinerates grease and food residue inside the oven cavity. After the cycle completes and the oven cools fully, wipe out the remaining ash with a damp cloth. Use the self cleaning cycle sparingly, as excessive use can damage internal components on older models.
Deep clean the broiler drawer
Grease and food drippings collect in the broiler drawer at the base of many ovens. If left unaddressed, accumulated grease in this area can ignite when the oven or broiler reaches high temperatures.
Every Year
Test oven calibration
Place an independent oven thermometer inside the oven and set the temperature to 350 degrees Fahrenheit. Allow 20 minutes for the oven to fully preheat and stabilize, then read the thermometer. If the reading differs from the set temperature by more than 25 degrees in either direction, the temperature sensor or thermostat has drifted and needs adjustment. An oven running significantly hot or cold affects cooking results and wastes energy every single time it is used.
Inspect the gas connector on gas ranges
Pull the range gently away from the wall and visually inspect the flexible gas connector at the back. Look for any visible kinking, corrosion, or damage to the fitting. If anything looks questionable, contact a professional immediately and do not use the range until it has been inspected.
Range Hood and Microwave Ventilation Checklist
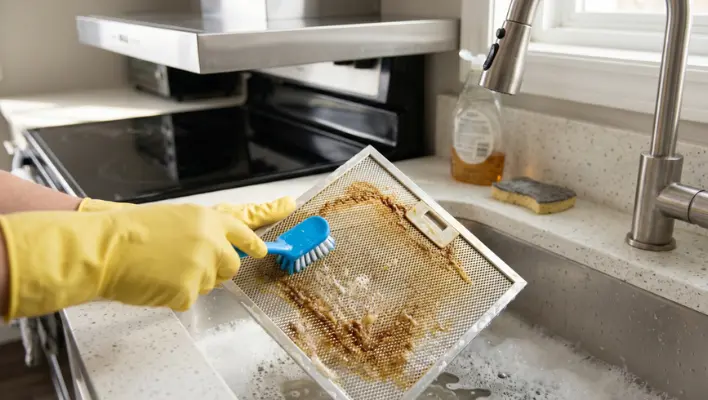
Range hood and microwave ventilation filters are among the most neglected components in any kitchen. They accumulate grease rapidly and most homeowners never think about them until the fan stops working or cooking odors stop clearing.
Monthly Tasks
Remove and soak the grease filter
The metal mesh grease filter inside the range hood or above the range microwave should come out every month for cleaning. Submerge it in a sink of hot water with a generous squirt of degreaser or dish soap. Let it soak for 15 minutes, then scrub and rinse thoroughly. Allow it to dry completely before reinstalling. A grease soaked filter provides almost no ventilation and creates a genuine fire hazard directly above a cooking surface.
Wipe down the hood exterior and control surface
Grease vapor settles on every surface in the kitchen, including the outside of the hood. A quick wipe down each month prevents buildup from hardening into a surface that requires significant effort to clean later.
Every 6 Months
Replace the charcoal recirculation filter
If your range hood or over the range microwave recirculates air through a charcoal filter rather than venting to the exterior, this filter cannot be cleaned. It must be replaced entirely on a six month schedule. Running the unit past the replacement point means cooking odors and grease particles are simply moving back into your kitchen air instead of being captured.
Washing Machine Maintenance Checklist
Both front loading and top loading washing machines require regular attention, though the specific concerns differ between the two designs. Front loaders are energy efficient but far more prone to mold issues. Top loaders are more forgiving but have their own maintenance requirements that are often ignored.
After Every Use
Leave the door or lid open
his single habit prevents the vast majority of mold and odor problems in front loading machines. For front loaders and top loaders, wipe down the rubber door seal to prevent mildew and leave the door or lid open between uses to allow the drum to air out. The interior of a front loader stays damp after a cycle ends. Sealing it shut while still wet creates ideal conditions for mold growth inside the drum and gasket.
Monthly Washing Machine Tasks
Run a dedicated cleaning cycle
Use a commercial washing machine cleaner tablet or add two cups of white vinegar directly into the drum, followed by half a cup of baking soda. This combination breaks down detergent residue, mineral scale, and any bacterial growth inside the drum and hoses.
Clean the detergent dispenser drawer
Remove the detergent and fabric softener dispensers and rinse them thoroughly to prevent clogs, mold, and mildew. Soap scum accumulates in these drawers surprisingly quickly and eventually causes the dispenser to clog, meaning detergent is not actually making it into your wash cycles.
Wipe the door gasket completely
On front loaders, pull back the folds of the rubber door gasket and wipe inside with a damp cloth or a diluted vinegar solution. This is where mold colonies establish themselves first when a machine is not properly ventilated between uses.
Every 6 Months
Inspect the inlet hoses
Inspect hoses every 6 months for wear and tear. Pull the machine away from the wall and examine both the hot and cold water supply hoses. Look for any bulging, cracking, stiffness, or corrosion at the connection points where the hose meets the wall valve and the back of the machine. Rubber washing machine hoses should be replaced every five years regardless of how they look visually. Upgrading to braided stainless steel hoses is one of the smartest investments a homeowner can make. A burst washing machine hose is one of the most common causes of serious water damage in residential homes.
Confirm the machine is level
Use a bubble level on top of the machine and adjust the leveling feet as needed. An unlevel washer vibrates excessively during spin cycles, which stresses the drum bearings, loosens internal components over time, and causes the machine to migrate across the floor.
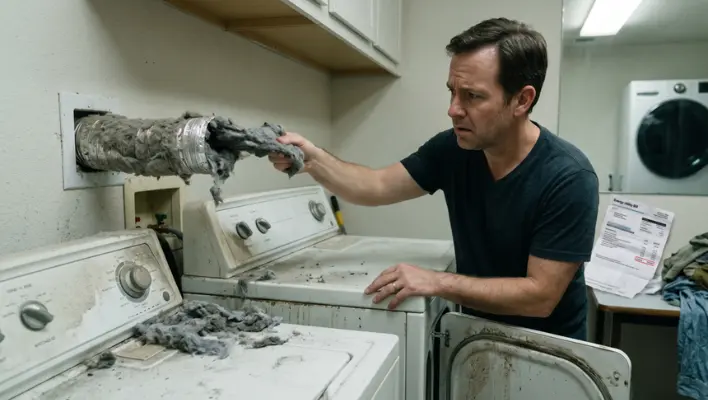
Dryer Maintenance Checklist
Dryer maintenance is the most safety critical section in this entire guide. Lint accumulation inside dryer vents is responsible for thousands of residential fires every year in the United States. Every task on this list is worth taking seriously.
After Every Load
Clean the lint screen
Every single time, without exception. This simple task is the most critical part of dryer safety. A clogged lint screen restricts airflow, makes the dryer work harder and longer, and causes lint to build up in the vent system, creating a fire hazard. This takes two seconds and there is no excuse for skipping it.
Monthly Dryer Tasks
Test the lint screen for wax buildup
Hold the lint screen up to a light source after brushing off visible lint. If you cannot see light passing cleanly through the mesh, the screen has a waxy film from dryer sheets that regular brushing does not remove. Wash the screen with warm water and a soft brush, rinse completely, and allow it to dry before reinstalling.
Wipe down the drum interior
Occasionally run a damp cloth around the inside of the drum to remove any residue from dryer sheets or fabric softener. This residue can leave marks on clothing over time, particularly on light colored fabrics.
Every Year
Clean the full dryer vent duct
This is a non negotiable annual task. A dryer vent cleaning kit with a flexible brush, available at any hardware store, allows you to work through the ductwork from the back of the dryer all the way to the exterior vent opening. Remove the vent hose from the back of the dryer, insert the flexible brush, and work it through the full run of ductwork to dislodge accumulated lint.
Inspect the exterior vent cap
Walk outside and locate where your dryer exhausts to the exterior of your home. The vent cap should have a flap that opens when the dryer runs and closes fully when it stops. A cap that stays open when the dryer is off allows cold air, moisture, and pests into your ductwork. A cap that does not open fully when the dryer runs is restricting airflow and forcing your dryer to work harder on every cycle.
Consider professional vent cleaning for long run
If your dryer vent duct runs longer than 25 feet or includes multiple 90 degree bends, the flexible brush kit may not reach the full length effectively. In these situations, a professional vent cleaning service with a powered auger is worth the cost, especially if the vent run has not been cleaned in several years.
Small Appliances That Deserve Regular Attention
Larger appliances get most of the focus, but several smaller units in your home have maintenance needs of their own that are easy to overlook.
Garbage Disposal
Monthly: Run the disposal with cold water and a handful of ice cubes. The ice cleans the grinding components without any chemicals. Follow with a few citrus peels to neutralize odors naturally. Never put fibrous vegetables like celery or artichokes, grease, or starchy foods like pasta and rice down the disposal. These either wrap around the grinding mechanism or expand with water and cause stubborn clogs.
Annually: Inspect the rubber splash guard at the top of the disposal opening. This component collects grease and food residue on its underside and is often the actual source of persistent disposal odors. Most splash guards can be removed, cleaned thoroughly, and reinserted without any tools.
Dehumidifier
Weekly during active use: Empty and clean the water collection basin. Standing water in a dehumidifier basin becomes a breeding environment for mold, mildew, and bacteria that the unit then circulates into the air inside your home. Rinse the basin with a mild solution of water and white vinegar to prevent buildup on the interior surfaces.
Every season: Clean the air intake coils and filter. A dehumidifier with dirty coils works harder and extracts less moisture per hour of operation, defeating its entire purpose.
Built In Microwave
After any splatter: Wipe the interior immediately. Baked on food inside a microwave absorbs microwave energy during future use and creates hot spots that can damage the interior coating and magnetron over time. A small bowl of water with a few lemon slices microwaved for two minutes creates steam that loosens dried food debris and makes wiping easy.
Every 6 months: Remove and clean the turntable plate and the ring it sits on. Grease and food particles collect in the roller ring and cause the plate to rotate unevenly, which leads to uneven cooking results.
Garage Door Opener
Monthly: Test the auto reverse safety function by placing a 2×4 flat on the ground in the center of the door’s path and attempting to close the door. The moment the door contacts the board, it should immediately reverse direction. If it does not reverse or reverses sluggishly, adjust the force sensitivity setting on the opener unit. This safety mechanism exists to protect people, pets, and vehicles, and it needs to actually work.
Every 6 months: Apply a garage door lubricant to the rollers, hinges, and the torsion spring above the door. Never use WD40 for this. It is a solvent, not a lubricant, and it actually attracts more dirt over time. Use a product specifically rated for garage door components.

Warning Signs That Mean Call a Professional
If your refrigerator is not keeping food cold enough, your dryer is taking forever to finish a cycle, or your dishwasher is not cleaning properly, it is clear that something is not functioning as it should. Many homeowners ignore these subtle shifts in performance, chalking them up to age or overuse, but a qualified technician can determine whether the appliance needs repair or simple maintenance to restore its efficiency.
Unusual noise
Banging, grinding, squealing, or humming sounds that were not there before are almost always early indicators of a mechanical problem. Ignoring unusual noises can lead to more serious issues down the line, making the repair more expensive.
Burning smells
A burning smell from any appliance indicates overheating, a failing electrical component, or in the case of a range, a grease issue. Do not ignore burning smells and do not attempt to diagnose electrical issues yourself.
Water pooling around appliances
Finding water around your washing machine, dishwasher, or refrigerator is never a good sign. Leaks can stem from damaged hoses, clogged filters, or faulty seals, and ignoring them can lead to water damage, mold growth, and expensive flooring repairs.
Appliance tripping a circuit breaker repeatedly. An appliance that keeps tripping its circuit breaker has an electrical fault that needs professional diagnosis. Running it again after resetting the breaker is not the right response.
Visible rust or corrosion
Rust on the exterior of a water heater or washing machine tub, or corrosion on appliance connections, signals that the component has been compromised and needs evaluation before the situation worsens.
If you are in the Abilene area and an appliance is showing any of these warning signs, connecting with a local appliance repair service is the most efficient path to a correct diagnosis.
When to Repair vs. Replace
The 50 percent rule is simple: if repair costs exceed 50 percent of the price of a new appliance, it is generally better to replace it. This rule identifies the point of diminishing returns of repairing older equipment.
Also factor in the age of the appliance. Once most appliances exceed their typical lifespan, they will begin to exhibit signs of failure even with proper maintenance. If your dryer has been operating for more than ten years, or your refrigerator is more than fifteen years old, look for indications of inefficiency to avoid unanticipated problems.
If you are in the Abilene area and an appliance is showing any of these warning signs, connecting with a local appliance expert is the most efficient path to a correct diagnosis. Local technicians understand the specific conditions of your area, including water hardness, climate demands, and the brands most commonly found in local homes, which typically means faster and more accurate service than a regional chain.
Not sure whether your appliance is worth fixing? Our Abilene appliance repair team can give you an honest assessment before you spend a dollar.
How to Build a Maintenance Schedule That Gets Done
The most common reason homeowners skip appliance maintenance is not indifference. It is that these tasks have no obvious trigger. The refrigerator sits quietly in the corner. The water heater hides in a closet. Nothing looks wrong until something goes very wrong.
The solution is to attach maintenance tasks to calendar events that already exist in your life.
Daylight saving time changes happen twice a year and are already used as reminders for smoke detector batteries. Use those same dates to also inspect washing machine hoses and test the water heater T&P valve.
The first day of each month is a natural anchor for monthly tasks. Set a recurring reminder on your phone and spend 20 to 30 minutes running through your monthly checklist.
Seasonal transitions align well with larger tasks. Spring cleaning naturally coincides with refrigerator coil cleaning, pulling appliances out to vacuum behind them, and deep cleaning the oven. Fall preparation aligns with checking all appliance door seals before heating season and flushing the water heater before winter demand increases.
Keep a simple maintenance log. Even a note on your phone recording what was done and when becomes invaluable when something goes wrong and you need to know when the hoses were last replaced, when the filter was last changed, or whether a part is still under warranty.

Final Word
The complete home appliance maintenance checklist is not about doing everything perfectly or all at once. It is about consistency. A home where the dryer vent gets cleaned annually, the washing machine hoses get replaced on schedule, the dishwasher filter gets rinsed monthly, and the water heater gets flushed every year will perform dramatically better and last far longer than a home where everything gets ignored until something breaks.
Pick the highest risk items first. The dryer vent, the washing machine hoses, and the water heater pressure relief valve are where the most serious consequences of neglect tend to land. Start there, build the habit, and expand from there.
Every appliance in your home represents a real financial investment. Protecting that investment through regular maintenance is one of the most practical, high return things a homeowner can do. The cost is almost entirely your time. The savings are real and they add up year after year.
When a repair goes beyond your comfort level, our home appliance repair specialists are just a call away.